Showing posts with label Bathroom. Show all posts

Thursday, December 1, 2011

A little privacy, perhaps?

So, those of you who have been to our hone may remember our naked windows throughout the house.  And naked windows = neighbors seeing naked people in our bathrooms.  Whoops.  Probably should have made window treatments in the bathrooms a priority over mums in flower pots.

So, a couple weekends ago, I decided to get off my butt and make some curtains.  Yep, I said make.  I had wanted to put up some dark brown bamboo style roman shades in both bathrooms, but all of our windows are very wide, and I couldn't find anywhere thay sells our window sizes off the shelf.  (By the way...I had an estimate done for custom shades.....$385 per window!  PLUS installation!  Pass.)  I had four white linen curtain panels just sitting in our linen closet, not being used (they used to be on the living room windows, but then I accidentally washed them in hot water, then dried them...and they came out about a foot shorter and looked weird) 

Sooo, I measured both bathroom windows and realized that I could use one panel for both of them.  I cut them to size, leaving 2 extra inches on all sides, since I was going to hem them.


I folded over about an inch, then pinned and ironed the edge, so it would be crisp, then folded it over again, so the rough edge was completely hidden on the backside.


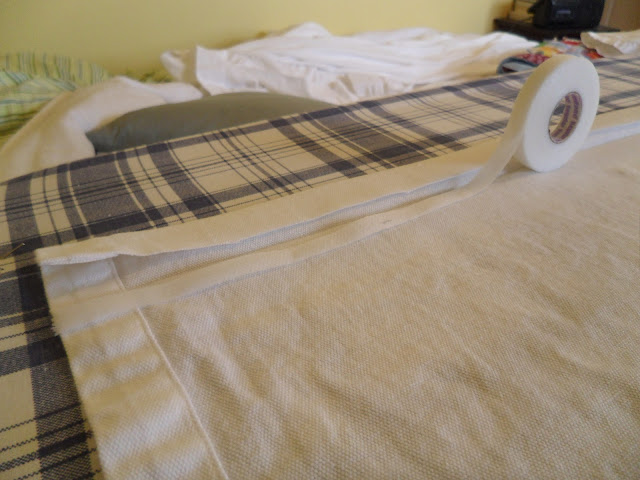
Now, once I had the crisp edge, I pulled out some iron-on hemming tape , pressed it underneath the hem (making a hemming tape sandwich with the fabric)....


Then ran the iron over both sides of it, creating a nice and clean no-sew hem.


And at this point I just realized that I haven't show you an update on the bathroom progress...for oh about 6 or more months...which is sad because the bathroom was the whole reason Matt and I started this blog to begin with.  Well, here is the current paint color, which is Sherwin Williams' Foggy Day color matched to Glidden's Premium Interior (Young House Love had bragged about Glidden's in the past so I thought I would give it a whirl since I'm not too attached to any paint brand.  Verdict?  I would say a 7/10...good, but not amazing.)  Here is the naked picture.  Children advert your eyes.


Here's a wider shot, so you can enjoy the color against the floors.


Do you love it?!  How about now?


I said, do you love it?!  I really don't care if you do because I would marry this bathroom if Matt ever comes to his senses and leaves my crazy, nutty butt.

Here's the downstairs bathroom window....I forgot to get a picture of it before hanging the curtain.  Now, this window is in the corner of the room, so I wasn't able to have two curtain panels, so I hung the rod about 6 inches farther over on the left side, to create a one sided curtain pull-a-ma-bob, instead of two.


We're painting this bathroom in a month or two, so the baby poop green will be gone soon.   I used a curtain rod I already had in the fancy bathroom and picked up three $5.00 curtain clip packs from Target to spread out over the two windows.  Oh and I picked up another curtain rod for the green bathroom for about $5.00.  Total investment for two bathroom windows to have curtains....about $20.00.  Not too shabby when that $20 is compared to the almost $800 a certain big chain department store would have charged us.

I realize it's maybe a little odd to have curtains like th eones above in bathrooms, but all of the curtains in our house are white, hung on the same rods, with the same clips...which I think gives us nice cohesive look throughout the house.

What do you think?  Are you happy your bare butts won't be displayed all over our neighborhood anymore?  I know I am...who knows about the neighbors though.

~S~

Wednesday, May 4, 2011

"Ugggh, it smells like farts in here."

This last weekend Matt and I picked up a new bathroom faucet.  I had found one online that I was in looove with, but at $198.99, it was about $100+ more than we wanted to pay.  We wanted something that was classic and a bit vintage looking, since the bathroom was pretty modern and we wanted to make sure the new bathroom blended in with the rest of the house.  Unfortunately, Matt goes crazy for anything modern, so he was of course instantly drawn to this faucet:


I was not a huge fan, but since I normally veto his choices right away, I gave in and we brought it home with us.  When we opened the box Sunday night, we both figured it would take about an hour at most to complete the switch (which is why we started at 8:00pm).  Here's why:


Only 4 pieces?  This will be a breeze.  Yeah, not so much.  Here is the original faucet:


We were going to leave it, but the little knobby thing on the back of the water spout was too close to the mirror and then the frame would not fit...and also all of our bathtub hardware is shiny instead of brushed like the old faucet...and I'm a freak about things like that matching.

First step was to turn off the water underneath the sink.  The second step was to remove the old faucet and plumbing.  Here is Matt doing that.  There weren't any instructions on how to remove anything, so we winged it and hoped for the best.  The handles simply pulled off with a little help from a Phillips screwdriver:


Then Matt used his muscles to twist off the bottom pieces of the handles:


And when muscles weren't quite enough....


Once the handles were off, Matt had to crawl underneath the sink to take apart the drain pieces that were holding the faucet spout and drain in place.  My job was to be quiet and not criticize while he was cramped under there...I did a B- job of it.  I did stuff myself underneath to get a few pictures though:


That green tagged piece is what attaches to the hot water handle.  You can see the cold water one in the background.  The gold pipe goes up and attaches to the drain.  In order to get the drain off, we had to take off the white "U"/ backwards "J" piece...which caused a minor panic when I pulled on it and water started coming out, but it was just a little water that had settled there when we turned off the water.  Here is what we found in the white pipe:


SICK!  But not anywhere near as bad as I thought it could have been...seeing as I am known to just wash any and all stray hair down the drain instead of wiping it out.  Here's the shot of the drain being out:


The next couple steps involved me thinking I knew how to install the drain and ripping pieces of it out of Matt's hands when he tried to help, which resulted in him walking away from me for a few minutes.  And then I broke a piece of the drain....and called Matt for help.  We figured out that we could still install the drain and it would work just fine (thank goodness) and I taught Matt a lesson to not walk out on me in the middle of projects, so take that!

The faucet handles slipped right into place and attached to the water lines below without any problems.  Same for the faucet spout.  Taking off the old drain and putting in the new one were the most time consuming parts of the project, so our "one hour project" ended up taking almost 2.5.  But check out the new faucet!


Whoa!  Who is that sexy, glasses-wearing, roughed up, sweaty, post soccer game goddess in the mirror? :) (yikes)

Like the faucet??  Once it was installed I loved it.  All my previous reservations about it being too modern flew out the window and I think Matt definitely made the right choice.

~S~

What a man, what a man

Yesterday was mine and Matt's 3 year anniversary (cue awwwww) and Monday night after my soccer game, I came home sweaty and exhausted to find a great surprise.  Matt had been on-call all day (at home) and worked on the bathroom!  He managed to take it from looking pretty good, but not done, to looking GREAT and almost done. 

I had finished painting the vanity doors last week and had picked up two knobs for the doors this last weekend at Home Depot (we also picked up a nail gun and air compressor, both on sale for $69.99 each).  Matt put on the knobs and reinstalled the doors, without even hinting that he had done it, that rascal. :)  He also reattached all the baseboards  (minus one, that we can't find anywhere...) and attached the mirror frame to the mirror!  Happy anniversary to me :)  Here are some pictures, so you check out the amazingness that is Mr. Kendall (witrh a little help from me too):


We made the frame for the existing mirror using trim sold at Home Depot.  We bought 3 pieces (it came a white color) and then Matt used his Miter Saw (from Mark and Janet aka the in-laws for Christmas) to cut the pieces to size and at 45 degree angles.  Once cut, we used Liquid Nails to conect the four corners.  And since we did not have a nail gun at the time, we used a staple gun to attach the four corners from the backside of the frame. (Yeah, we're a bit hillbilly like that)  It actually worked and held up nicely.  Once the Liqud Nails dried, I painted 3 coats of the Marth Stwerart paint we had picked out over the wood.  We also bought, painted, and attached the 4 squares in each corner of the frame.  I like to think it gives it a little somethin' somethin' extra.  Though it looks different in the above pictures, the frame and vanity are the same color.

Here's a before and after to get a better idea of how much more awesome the new sink area looks.

Before:


And After:


If you're extremely observant, you may have also noticed the new sink faucet!  I'll post about that ordeal tomorrow...or later today maybe.  Here's another new thing we added (which you may have noticed on the back of the door above):


Cute, huh?!  I found them at Pottery Barn.

With all these little things being done...we are sooo close to being 100% finished!  I will be painting the walls (man, how many times have I already said that?...) THIS WEEK and also painting all the trim and baseboards.  Since our wonderful house has crooked walls galore, I have some serious caulking to do around all the baseboards.  And find that missing baseboard....  I know, you're super jealous of the fun times ahead, right? :)

~S~

Thursday, April 28, 2011

A little vanity perhaps?

The bathroom make over continues...and continues...and continues.  Matt is back to his 12-20 hour days at work and I have been a couch slug lately (seriously, will it even stop raining and get above 43 degrees?), but decided enough was enough and I needed to get a move on with things.  We also have a whole mess of company coming next weekend too, so the clock was ticking.

The next step was to either replace or redo the bathroom vanity.  We had looked at a bunch of different stores, websites, and even thought about building our own, but when it came down to it, we were flat out running out of steam on this remodel.  Sooo, I used one of favorite hobbies to our advantage....painting.  I decided that the most economical solution would be to paint the vanity.  (Also, our vanity is a really weird size, 41" wide....where most pre made vanities are 39" or 43", so we would need to have it custom made, which = $$$$$ and I like to save all our money for shopping sprees at Target.)  Here are two super old pictures to remind you what the vanity looked like at the beginning of the bathroom project:


And at this time, I would like to make an apology to the Martha Stewart Paint line...in this post I complained about not liking Martha Stewart's paint...but I have determined that I just don't like it for painting walls.  I am in love with her paint for painting furniture.  The thickness of the paint covers furniture like it's no one's business!  One coat into the vanity painting project and I was ready to make out with a paint can.  But I'm getting ahead of myself.

We picked out a rich and deep chocolate brown color from Martha's line and had a quart of it made using semi-gloss paint.  We brought it home, and like most projects, the paint sat there for about a week before I got off my butt and started redoing the vanity.  I first took off both doors and the hinges (the doors did not have knobs on the outside) and wiped the doors and vanity frame with a damp paper towel.  The finish on the whole thing was kind of coarse to begin with, (and I'm lazy) so I skipped sanding it all down and jumped right into the first coat of the brown paint.  And loved it!  Even one coat in, I was freaking out over how good it looked!


{And yes, it you noticed there is a pregnancy test box under there...
NO we are not pregnant and not trying and will not be for a very long time...
I just freak out once in a while and convince myself I could be, when I'm not.}


Granted, it looks a little rough since it's only the first coat, but are you loving it?!  I think it really pops in the room now too, instead of getting lost with the white trim and white vanity top.  The night I did the first coat, I dragged Matt upstairs the second he walked the door to show it off and he was almost as excited as me about it.  I've done two more coats since and it looks aaaaamazing!  I think I'll do a coat of polyurethane over it all since it will most likely come into contact with water quite frequently.  I just need to pick up the new knobs for the doors and pull thingys for the fake drawers above the doors.  (By the way...fake drawers in a bathroom are the most ridiculously annoying thing ever...where do I put the toothpaste?!  So far, on the counter top.)

So, once we decided to paint the vanity, Matt and I also decided to make a frame for the bathroom mirror to match.  Here's a quick glimpse of the almost completed frame that Matt and I (mostly Matt) built from scratch!


PS....We got our first blog comment ever this week!  Thanks LC for commenting! :)  Also, thank you so much to everyone out there who reads my posts and follows us.  I honestly appreciate every comment, email, and text I get from you all and your support for this blog :)

~S~

Monday, April 18, 2011

Bathroom Update!

Wow, it has literally been 32 days since I gave you any sort of information about how the bathroom is coming along.  For starters, the floor is done.  I didn't give you a post about doing it because I wasn't there for any of it.  Matt used his last week off from work to finish the bathroom floor.  What a man :)  Go back and read this posting, but imagine Matt doing all the steps on the floor instead of on the walls.  Got it?  Ok.

So, I am one who never buys the little jars of sample paint colors from Home Depot.  I pick a color, sometimes bring the card swatch home and then dive in head first and buy a whole gallon of whatever color I picked out.  This is a-ok about 80% of the time.  The bathroom was not one of those times.  I picked out about 20 samples of different shades of grey paint from the Depot and went over and over them.  But I did not buy a sample jar.  I bought a full gallon of Martha Stewart Living Paint Semi-Gloss in Chinchilla....which I though was the perfect grey.  Not so much.  After putting 2 coats on the walls (and it took for freaking ever.  Our bathroom has about 17 different sized walls/nooks-n-crannies/angles.  And then Matt walks in (I'm the painter in our family) and says, "Ughhh, it looks purple."  And it did...in a light grey kind of way.  I told him was nuts and left it....and now after it being done for about 3 weeks, it definantly looks grey-ish purple.  Here are a couple action shots.  First, with only around the trim painted (one coat):


Then a little more:


And here's with a more accurate idea of the wall color.  And the awful towel hook I installed when we first moved in 2 years ago....can you even see it?


And the NEW fancy (aka normal) towel bar!  Hotchy Motchy :)


Part of me wanted to leave the grey-ish purple (my stubborness) but in the end, the room was looking way too steril for it's own good.  Sooo, we picked out a color we liked at Sherwin Williams and had Home Depot  match it to a less expensive type of paint.  I decided to try Glidden's Semi Gloss this time.  I wasn't 100% impressed with Martha Stewart's paint.  The color was true to it's swatch, but I felt like the paint was kind of thick and hard to put on the walls.  Glidden's was the exact same price as Martha Stewart, so I gave it whirl.  Luckily, Home Depot had Sherwin Williams' colors in their paint database, so they were able to match it without any problems.

I hate hate hate blogs that put up "teasers" without a finished product, but I haven't had a post up in over 10 days....so I'll leave you with the bathroom as it is now.  I'll be painting it the new color hopefully this weekend.

Thanks for sticking with us! :)

~S~